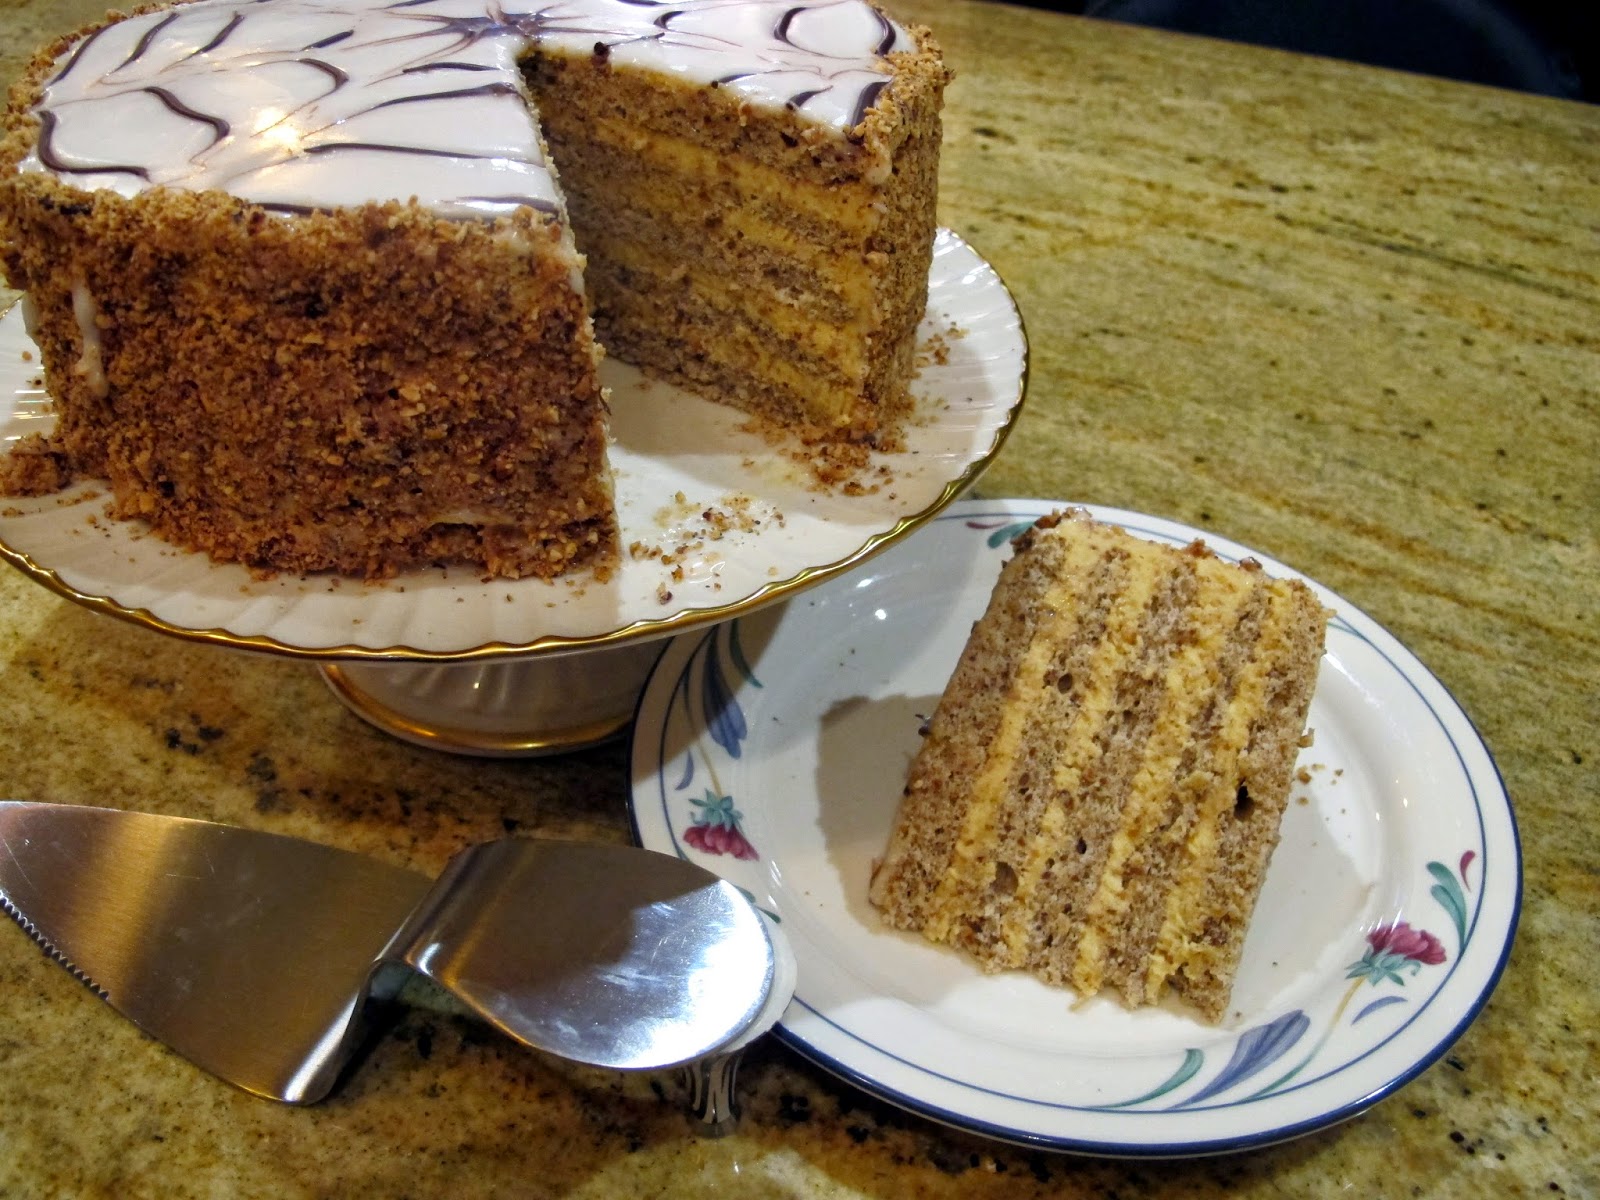
For the month of January Jelena from A Kingdom for a Cake invited us to start this year with a dreamy celebration cake. She challenged us to make the Esterhazy cake a.k.a the Hungarian dream. What better way to start the year than with a sweet dream?
Today in New England we had quite the weather. It has been snowing since noon on Tuesday and there have been periods of blizzard conditions that prompted advice from authorities to stay inside. Having procrastinated this month's challenge to the very last minute, I thought it a perfect day to fire up the ovens and make this house smell delicious. And the Esterhazy torte certainly filled that bill. The recipe has several stages. If you don't want to spend all day in the kitchen, do the torte over a couple of days as advised by Jelena.
Because the torte filling is made with lots of egg yolks, I recommend keeping the torte chilled until serving and refrigerating leftovers...if there are any. I thought the torte would be very sweet with all the sugar but the nuts really balanced it all out.
Here is the recipe from Jelena:
Esterhazy Torte
Servings: 10-12, Original recipe in metric
Ingredients
HAZELNUT SPONGE LAYERS
12 large egg whites
1 cup plus 1 tablespoon (9 oz) (250 gm) caster (superfine) sugar
2 tablespoons (2/3 oz) (20 gm) vanilla sugar
2½ cups (9 oz) (250 gm) ground hazelnuts
2/3 cup (2¾ oz) (80 gm) plain (all purpose) flour
HAZELNUT CREAM
12 large egg yolks
1 cup plus 1 tablespoon (9 oz) (250 gm) caster (superfine) sugar
2 tablespoons (2/3 oz) (20 gm) vanilla sugar
1 -1/3 cups (10½ oz) (300 gm) butter at room temperature
1½ cups (5-1/3 oz)(150 gm) toasted ground hazelnuts
APRICOT JAM GLAZE
around 3 tablespoons (45 ml) (1-2/3 oz) (45 gm) apricot jam1 teaspoon (5 ml) water
WHITE ICING
2½ to 3¼ cups (10-2/3 to 14 oz) (300-400 gm) icing (powdered) (confectioners') sugar
2 teaspoons (10 ml) sunflower oil
3-4 teaspoons water(15-20 ml) lemon juice
2 teaspoons (10 ml) sunflower oil
3-4 teaspoons water(15-20 ml) lemon juice
around 4 tablespoons (60 ml) hot
CHOCOLATE DECORATION
¼ cup (1¾ oz) (50 gm) dark chocolate
1 teaspoon (5 ml) oil
1 teaspoon (5 ml) oil
HAZELNUTS
¾ cup (3½ oz) (100 gm) roughly chopped hazelnuts
Directions:
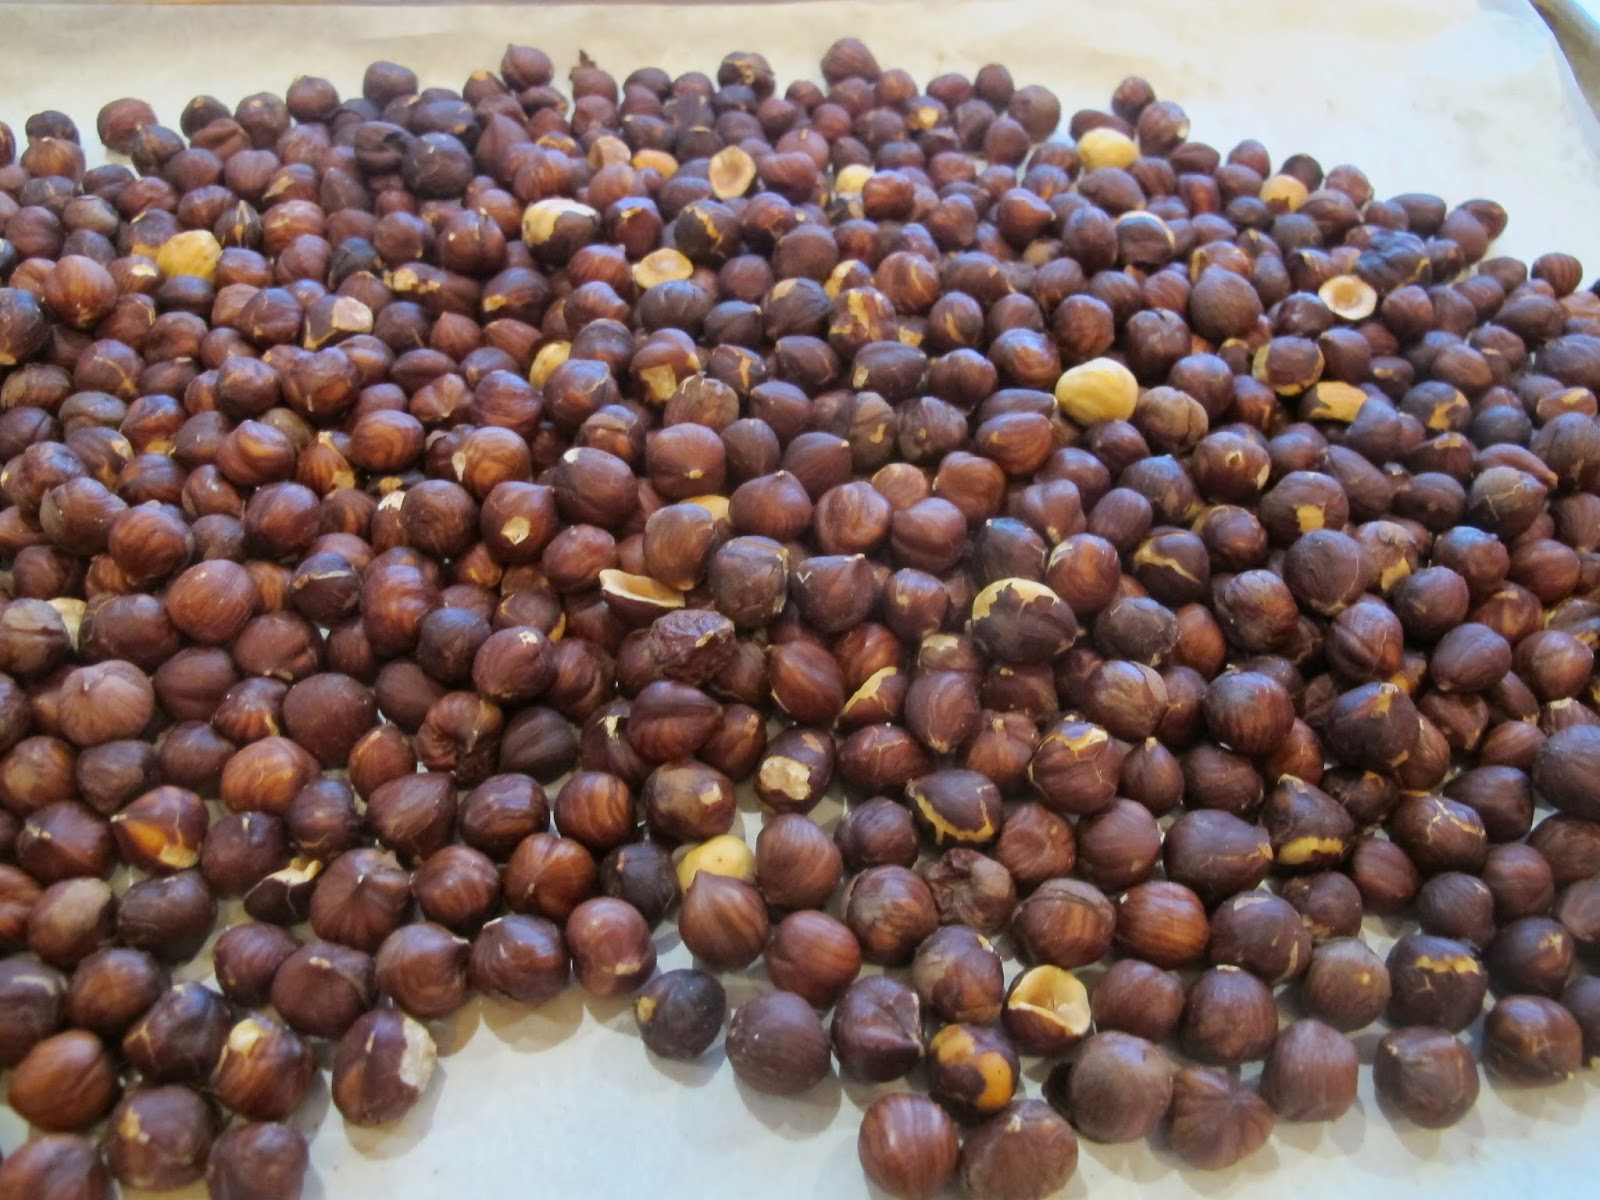
Place the hazelnuts on an oven tray in a cold oven, increase the temperature to moderate 180°C/350°F/gas mark 4, and bake until a nice aroma starts to come out of the oven and the nuts have become darker.
Continue until their skins almost turn black or dark brown and the hazelnut 'meat' becomes a caramel color. You will need to watch the oven carefully since the nuts can easily burn. From time to time, just open the oven and carefully try one to see if the center is nice and crispy, but be careful not to burn yourself. It should take about 15-25 minutes.
This baking process brings out the aroma of the hazelnuts needed for the cake. (If you are using almonds instead of hazelnuts, they need to stay white. Hazelnuts are not good in this cake if their aroma is not present.)
Let them cool.
Set aside ¾ cup (3½ oz) (100 gm) toasted nuts and roughly chop them. These will go around the cake at the end.
The rest need to be ground. A grinding machine is best since a food processor might turn the hazelnuts into a creamy mush. If you are using a processor do it in short pulses so they do not have the consistency of peanut butter but of fine powder.
Divide the ground hazelnuts into 2 batches of 2½ cups (9 oz) (250 gm) and 1½ cups (5-1/3 oz) (150 gm) for the sponge layers and the filling respectively.
HAZELNUT LAYERS (Dacquoise layers)
With an electric mixer beat the egg whites while gradually adding the sugar and vanilla sugar for about 5 minutes until stiff peaks form.
Turn the mixer to the lowest speed and add in the hazelnuts mixed with the flour and beat until just combined.
Cut baking paper into five squares large enough to draw a circle of 10 inch (25cm) in diameter on the squares.
Turn the paper over and place one piece onto an up-side down oven tray and delicately spoon inside the circle one-fifth of the beaten egg white mixture.
Place the tray into an preheated moderate 325°F/160°C/gas mark 3 (no fan) oven and bake for 14 minutes. It will look soft but that is how we want them. Your finger should not stick to the layer when you touch it.
Take the layer out together with the paper and place on an even surface
Cool the oven tray and repeat with the next 4 layers. It is important that the up-side down oven tray is cool when you start to bake the layers.
If you have a 10 inch (25cm) diameter spring form pan with a removable bottom just cut out five pieces of baking paper to fit the bottom and spoon the mixture in the pan.
Make sure to cool the bottom of the pan after removing each layer and before placing the egg white mixture for the next layer into it.
Place all the layers next to each other.
HAZELNUT FILLING
The filling is cooked in a double boiler. If you do not have a double boiler just take two pots so that the smaller one fits perfectly in the larger one and there is no gap between them.
Fill the larger pot with about 1-inch (2 cm) water place on the stove and bring the water to a slow boil, the water should not touch the smaller pot bottom.
Beat the egg yolks and the sugar with an electric mixer in the smaller pot for 30 seconds. Place the smaller pot into the larger one and cook for 14-15 minutes. Stir every 2-3 minutes for a short while with a wooden spoon always scraping the sides and the bottom. Stir constantly, near the end.
Let the filling cool.
Beat the cooked yolks for 30 seconds with an electric mixer.
Beat the room temperature butter for 2 minutes until light and fluffy then beat into the cooked yolks.
Add in the ground hazelnuts and beat again until combined.
Set aside 2 tablespoons of the filling to spread around the torte at the end.
Divide the rest of the filling into 4 cups.
Line a large tray with some baking paper.
Remove the baking paper from one of the dacquoise and place it onto the tray, spread one quantity of filing evenly over the dacquoise, then place another layer on the top.
Repeat, making sure that the last layer is placed bottom-side-up (do not place filling on this surface) which will make it easier to obtain a smooth looking finish.
Place some baking paper over the torte. Press a bit with your hands to even it out, put another tray over the torte and now place something heavy on the top to allow the torte to level up. A pan half-filled with water will be fine.
Place the whole torte with the pot in the fridge for one hour.
APRICOT JAM GLAZE
Heat the apricot jam and water on the stove.
Remove the top baking paper from the torte and spread the jam on top of it. We want a very thin layer, just barely covering the torte.
Place the torte back in the fridge for 30 minutes for the jam to cool.
When the 30 minutes is up, spread the 2 tablespoons of reserved hazelnut filling around the cake.
By hand mix the powdered (icing) (confectioners') sugar, oil, lemon juice while adding teaspoon by teaspoon of hot water until the mixture is creamy, but not runny. Mix vigorously for a couple of minutes. The sugar should be lemony.
With a hot wet large knife quickly spread the icing over the apricot layer.
You will need around 2½ to 3¼ cups of powdered sugar but it is better to have more than less, since when you start spreading you cannot go back. You will have some left over icing. If it is a bit uneven just turn on the hair dryer and heat the icing so it will smooth out a bit.
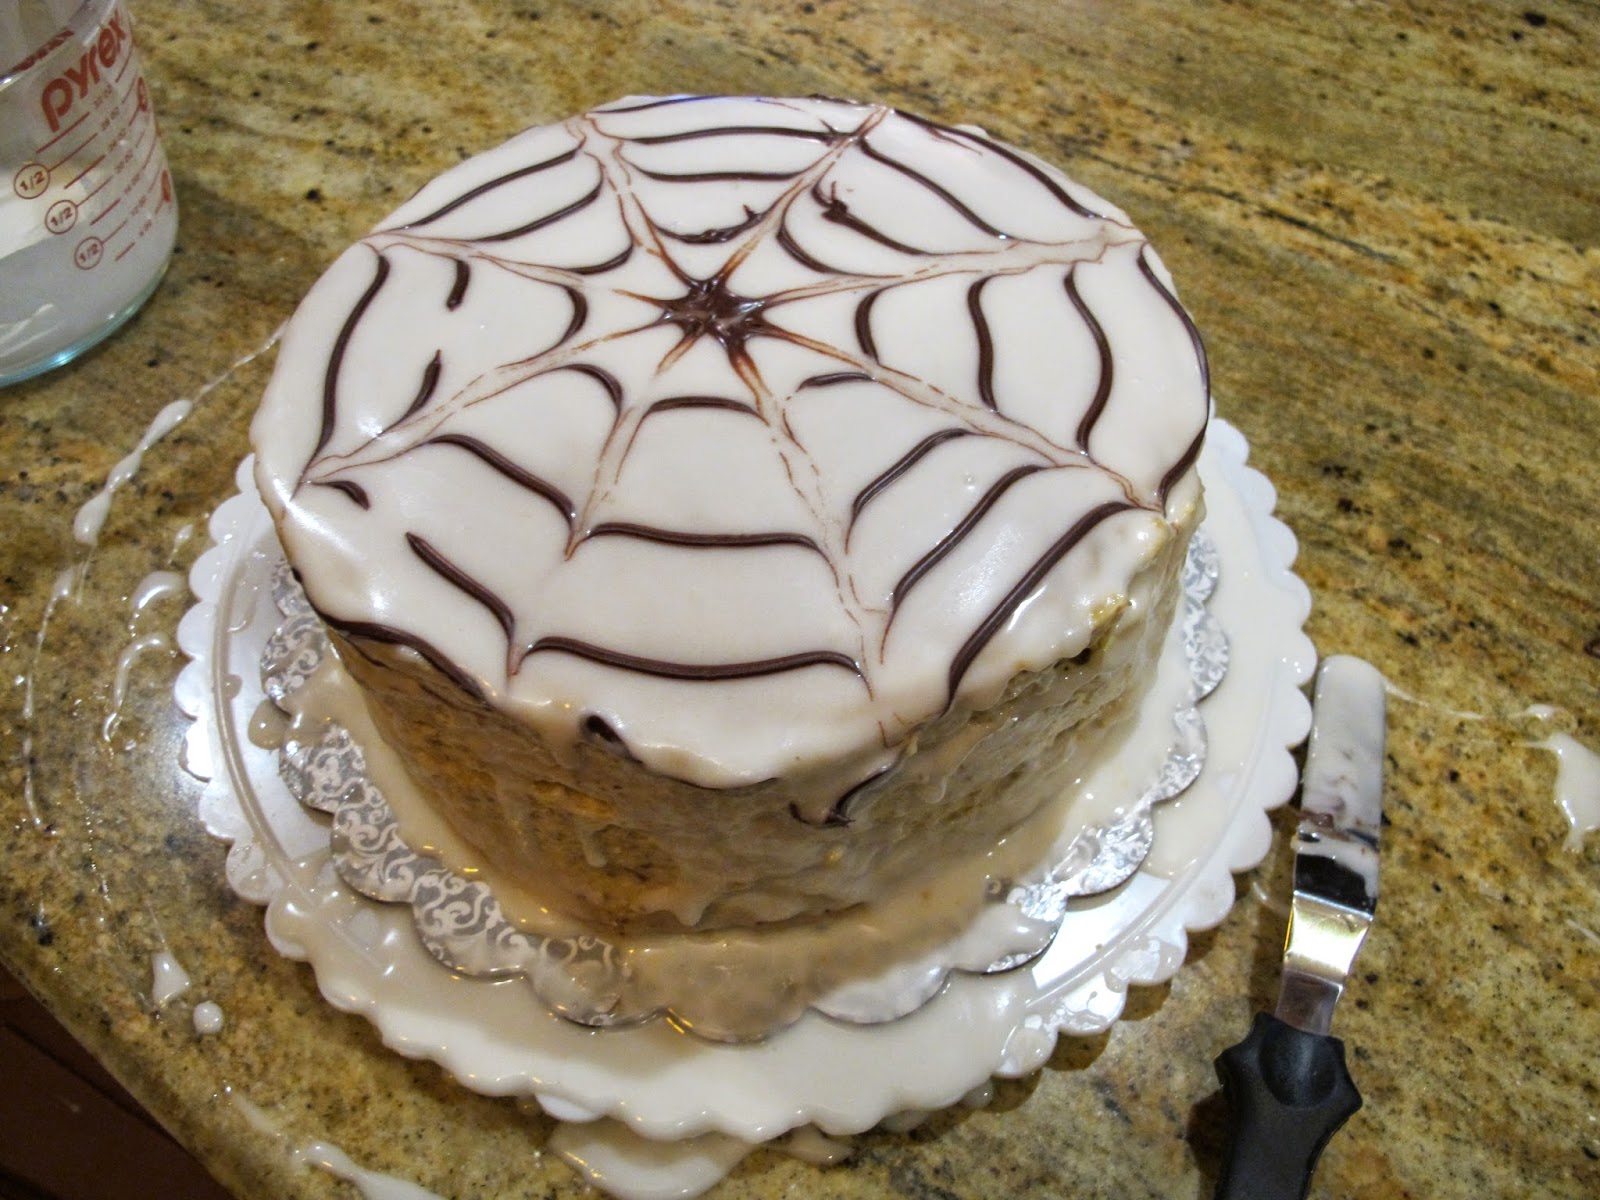
Before starting with the icing have the chocolate ready since it needs to go onto the soft icing in order to get the web.
Melt the chocolate with a teaspoon of oil, place in a pipping bag, or a plastic bag with a cut in the corner that will act as the tip.
Draw four (4) concentric circles onto the cake, then with a knife (not the sharp side) or a wooden skewer run six (6) lines at 30 degree angle to the cake to get the decoration (see pictures for more details). Each line should be in a different direction. One running away from you and the next one running to you.
Press the remaining crushed hazelnuts around the cake to complete the decoration.
Let rest in the fridge for at least 24 hours before tasting. This cake that gets better as times goes by. We usually enjoy ours for 7 days.
 |
| Toasted hazelnuts |
 |
| Cooking the Cream Filling |
 |
| Butter and Nuts Added to Cream Filling |
 |
| Meringues ready to be baked |
 |
| Baked meringue |
 |
| Assembly time |
 |
| Looks good but needs some cream filling to fill in those gaps |
 |
| That is better |
 |
| Apricot jam with sugar icing over it |
 |
| I need to work faster!!! |
 |
| Looked good for a moment..then I put chopped hazelnuts around the sides and it looked great |
 |
| Tired snow angel: too much snow shoveling and not enough cake |

Fabulous web! Your cake looks so high! Beautiful! On a side note, I see that you had the same problem as me when copying and pasting the recipe (ie the white background in the text). This never used to happen. What do you think is happening?
ReplyDeleteHow I managed to miss your post I have no idea! I am so glad I had another look through the cake roll! It looks perfect! And so nicely documented :) Thank you so much for baking with me this month:)
ReplyDeleteHello Evelyn,
ReplyDeleteThank you so much for sharing this, it looks amazing! :)