Friday, November 27, 2015

THE DARING BAKERS’ NOVEMBER, 2015 CHALLENGE: CHEESE CAKE CRUMBLE PIE


Today is the day after Thanksgiving. While I love Thanksgiving  with the gathering of friends sharing lots of food and fun, my most thankful feeling is that it is over. I cook too much. I eat too much and I make a monumental mess. The mess is not limited to the kitchen where thankfully my dear friends help straighten my mess. I will be sorting through piles of  mess throughout the house for a week.

Today is also Black Friday where everyone goes shopping and stands in line to save a penny. Not me!  I am waiting for Cyber Monday although I think Cyber Monday actually started last Thursday and Black Friday started last August. I find it hard to keep up as every business seems to have its particular spin on the dates and deals.
So what has this got to do with this month's challenge?? Umm nothing really, I am just ranting.

For the month of November Krista & Nicole of “Two Cups of Sugar.”challenged us to make our own version of cheesecake crumble pie.
This month's challenges was very interesting to me and I made the pie  early in the month. I did not make it for Thanksgiving because I experimented a bit, as challenged by Krista and Nicole, and found a cheesecake pie that worked a little better for me .


Here is the link to their challenge. The last recipe in the challenge, BLT cheesecake Pie,  is now on my bucket list.  I need to recover from cream cheese overload for a little while before I tackle the recipe so I am keeping the recipe on file for the rapturous time when tomatoes are in season here again.
Making the cheesecake pies is fairly easy. I used my usual pie crust recipe which works well for me.


Add caption


The filling recipe is really nice and there were no unsightly lumps of cream cheese floating in the batter. Yes, that sort of thing happens if I do not coddle and hover over my cheesecake batter.


 I used raspberries and blackberries and they seemed most appropriate for a crumble pie which is typically very sweet. The lemon zest in the recipe also blended nicely with the fruit. The recipe for the topping made a lot and seemed drier than the the challenge picture. I covered the pie as much as I thought useful and
kept the rest for another project. It should freeze well.

The pie came out really nice. The baking method is to start with a high heat, reduce the heat after 10 minutes and baking for an hour. Then, turn the heat off and  leave in the oven with the door ajar. for 30 minutes.


 I think that I should have turned the heat off in the oven  sooner. I think a little less cooking would have given creamier filling results though the longer cooking time created a nice pie crust and a lovely golden topping. The taste was sweet, fruity and very rich. Small slices of pie  are manageable which is great is you are serving a crowd.

The second pie recipe is Pecan Cheesecake Pie that I got from a Southern Living magazine and combines my two favorite desserts, pecan pie and cheesecake. There is a layer of cheesecake and a layer of pecan pie that magically transforms into a plate of pure joy. This pie has a couple of separate elements that at first sight might seem cumbersome but whip together easily.  I did serve this pie(along with a lot of other desserts) for Thanksgiving. This is one recipe I will make again next year.
When making the Pecan Cheesecake Pie, be sure to use a deep dish pie pan or else there won't be enough room for both fillings. I made that mistake on my first try with the pie. If you don't have a deep dish pan, then I recommend that you use all the cream cheese mixture, top with the pecans and  fill to the top with the corn/syrup egg mixture. You will have some leftover corn syrup/egg mixture but the pie will still be really good. I believe this is best served slightly chilled so I advise removing the pie from the fridge about an hour before serving. Unlike most cheesecakey desserts, this pie will keep well in the fridge for a few days or until you have sneaked enough "slivers" while cleaning up the Thanksgiving mess. Not that I would know anything about that!
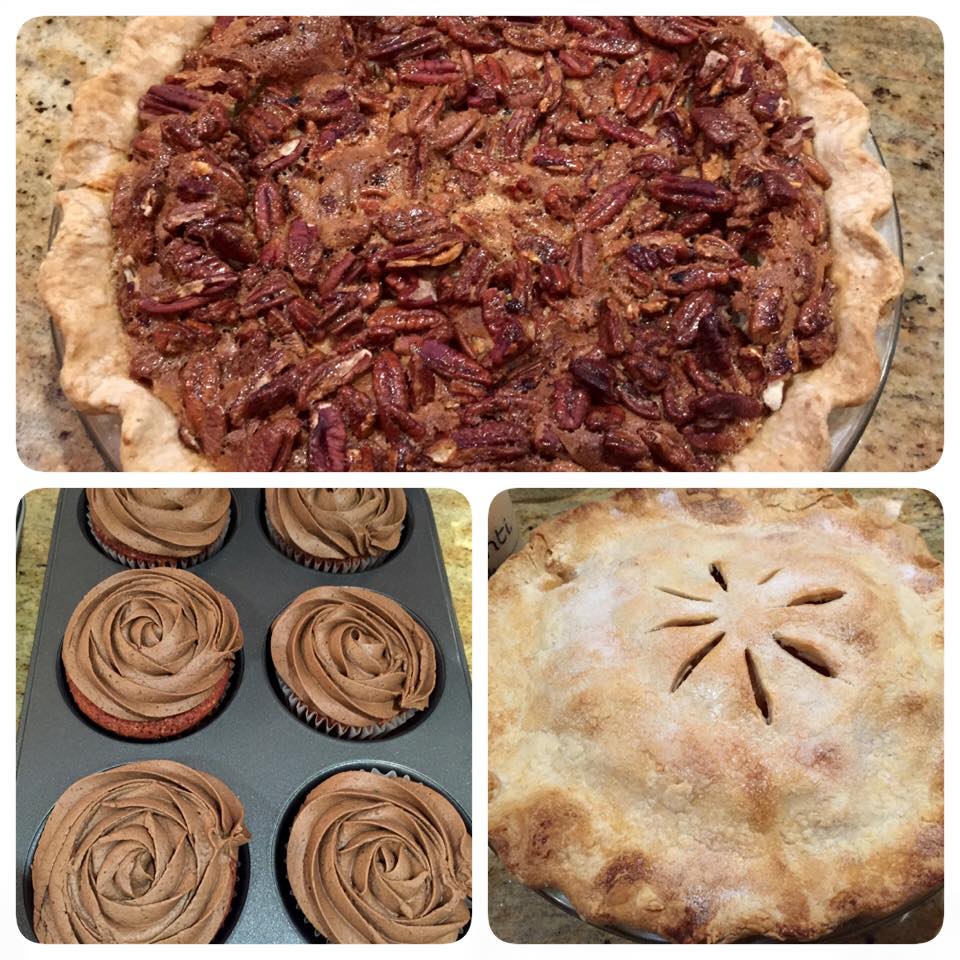
Pecan cheesecake pie is top picture and  top dessert dog over red velvet cupcakes and apple pie!

Sunday, October 11, 2015


Autumn in New England is apple time. We love our apples! My local farm stand has them front and center. There is usually a small crowd gathered around them admiring the abundant varieties. The apples have exotic names that give no clue to their sweetness or best use leading to serious discussions about which apple should be used for what purpose from those "in the know".

I have been sitting (not literally) on this recipe all summer. I got the recipe from Marmiton. It is a French cooking site and has the most wonderful recipes. I am like a kid in a candy shop when I visit the site and have spent  many evenings looking at their videos and reading the recipes. I started with this site to help brush up on my French for a recent  trip to Paris. The original title for this dish is Verrine de mousse au chevre. Verrine means jar in French and the layers are beautiful to see so I recommend using a glass vessel of some sort to serve the salad. The salad is cute as can be and made the evening seem much more special than a mundane Wednesday night.  I think  a lovely way to start a dinner party is with the salads already sitting at the table.

Here is the link to the original recipe. I adapted it a bit to fit my needs. Also, I had not yet made the trip to Paris  so I did not have any Espelette de piment. I used smoked paprika as advised by another source and it was really nice. I used  Gala apples for the salad. Gala apples have a sweet flavor but stand up well to heat of the  saute pan so there are some nice textures in the salad. There are two kinds of goat cheese, the regular log style that I see in every cheese bin at the grocery and fresh goat cheese which I found locally at an upscale Whole Foods market. The fresh goat cheese was more of a cream cheese consistency and had a milder cheese flavor. I used Fage plain flavored yogurt. Fage is very trendy  in my area right now. I like it because the texture is creamy and the consistency is a little firm. I don't think the brand of yogurt  will make or break this salad.

I served this salad with some thick sliced,grilled pork chops and roasted spaghetti squash. Because I had a lot of Parmesan tuiles leftover, I kept them out for snacking during the week.

Here is the recipe:

Verrine de Mousse au Chevre -adapted for Evelyn's house

3 apples
1 tablespoon unsalted butter
4 ounces yogurt, whole milk
2 ounces goat cheese, log style
1 ounce goat cheese, fresh
1 bunch arugula leaves
6 ounces Parmesan cheese
1 tablespoon balsamic vinegar
2 tablespoons extra virgin olive oil
salt and pepper, to taste
1/8 teaspoon smoked paprika, or piment espelette


1. Make the Parmesan tuiles: Preheat the oven to 350 °. Line a small cookie sheet or sheetpan with parchment paper. Drop a small pile of shredded Parmesan onto the cookie sheet. Bake until tuiles have turned a light golden on top about 6 to 7 minutes. Keep an eye on them as they will burn quickly. Remove from the oven. Using an off set spatula, immediately transfer the tuiles to a drape over a rolling pin and allow to cool. This will give them the slightly curved shape. Yes, they were that easy!!


2. Peel apples and cut into small cubes. Melt butter in a medium saute pan over medium heat. Add apples and saute until browned and softened. remove from heat and set aside to cool.


3. Mix together the yogurt, goat cheeses in a food processor and blend well. Season with salt and pepper to taste.


4. Make a vinaigrette by whisking together the balsamic vinegar, oil and either smoked paprika or espelette pepper, if available. Toss the vinaigrette with the arugula. Season with salt and pepper to taste.

5. To assemble: Use a clear container such as a jar or deep martini glass to best show off this salad. Spoon the apple among the 6 glasses. Top with the goat foam. Then top with the arugula. Garnish with the Parmesan tuiles.


Merçi Marmiton


Sunday, September 27, 2015

THE DARING BAKERS’ SEPTEMBER, 2015 CHALLENGE: IRISH SODA BREAD


For the month of September Meredith from the Poco Loco Olsons challenged us to experiment with soda bread. Here is the link to the Daring Bakers Challenge as presented to us. I am so excited to share this recipe with you as a truly quick bread that is delicious.

There is a lot of history to Irish Soda bread which was not, according to many sources, developed by the Irish. Here is a link to The Society for the Preservation of Irish Soda Bread. It gives a good reading on the history of soda bread.

Here is a link to a site that is called European Cuisines and discusses Soda Bread. I found it very informative about the European take on Soda Bread.

There are many variations on soda bread and the ones considered true soda breads are quite plain. The dough rises through a chemical reaction between the soda and buttermilk. Adding dried fruit or orange zest or nuts does make a tasty bread but these are considered tea breads, not soda breads.

The bread is crazy easy to put together. Irish soda bread is a good one to teach children for a first baking experience. The hardest part is waiting for it to cook as the bread needs about 45 minutes to an hour. I am happy to report that eating a slice as soon as it is cool enough to handle is a delightful reward for patience.
 I was amazed how delicious the bread was because I was a big skeptic.. I thought it would be really dense and heavy tasting. Instead the bread was light, bright tasting and very tender. Having some sharp cheddar cheese and a dab of orange marmalade made my afternoon tea a real pleasure.
The bread does not keep though and after a day, its fate was croutons which I tossed in olive oil and lots of herbs so it tasted completely different.

Having great success with Meredith's recipe, I thought I would experiment with others to get some perspective. I found a web site that was so interesting,I bookmarked it. It is the  called Bord Bia-Irish Food Board and they had a recipe for Brown Soda Bread that I just had to try. The bread tasted very different than Meredith's recipe. It was a bit heavier and rich tasting with a hint of sweetness from the honey. I am thinking some rum soaked raisins mixed into the batter would put it over the top for taste and make a wonderful morning toast. I put some local jelly on it, Dalby Farms Strawberry Butter. It is really a jelly, not a butter but it was so smooth and creamy tasting with a powerful strawberry flavor, that the mouthfeel was definitely butter.

I am keeping Meredith's recipe handy. I love fresh bread with dinner, especially stews. As Autumns is giving us cooler evenings, I am looking forward to whipping up a loaf of this bread to get those delicious broth from a hearty vegetable soup.


Irish Soda Bread (I halved this recipe to make a smaller loaf)

Ingredients:


  •  2½ cups (625 ml) sour milk or buttermilk
  • 2 cups (500 ml) (300 gm) (10½ oz) whole wheat four (see note above on how to measure flour) 
  •  4 cups (1000 ml) (600 gm) (21 oz) all-purpose (plain) flour (see note above on how to measure flour) 
  • 2 teaspoons (10 ml) (10 gm) baking soda 
  •  1 teaspoon (6 gm) salt

Directions:
 1. Preheat oven to hot 450°F/ 230°C/gas mark 8 and line a baking sheet with parchment paper.
 2. Mix the dry ingredients in a medium-sized bowl. (I do this by hand, but you could use a mixer if you’d prefer.)
3. Make a well in the middle of the dry ingredients.
4. Pour the sour milk/buttermilk into the well.
5.Mix the dough until the flour is completely incorporated. (It will be very stiff. I find it helpful to knead the dough by hand a few times while it is still in the bowl to make sure all of the flour is incorporated before moving on to the next step.)
6.Transfer the dough to the prepared baking sheet.
7. Pat or roll the dough into a circle shape that is approximately 1 inch (2½ cm) thick.
Using your fingertips or the blunt end of a wooden spoon handle, make several dimples in the top of the dough. (This is very similar to the technique used when making focaccia bread.)

8. Place the baking sheet on the middle rack of the preheated hot oven and bake for 30 minutes.
 9. Reduce the heat to moderately hot 400°F/200°C/gas mark 6. Pull the baking sheet out from under the dough, so the parchment is directly on the oven rack. Bake for 10 more minutes or until the top is golden brown.


 Traditional Brown Soda Bread


  • 250g whole wheat flour
  • 200g all purpose flour
  • 1 teaspoon baking soda
  • 1 teaspoon salt
  • 1 egg
  • 350 ml buttermilk
  • 1 teaspoon honey
  • Optional Topping: 1 tablespoon sesame seeds or pinhead oats
Directions:
Preheat the oven to gas mark 6. 200 degrees C(400F)
Mix the flour, baking soda and salt in a bowl. combine the egg with the buttermilk and honey, then mix into the flour. Add more buttermilk if the batter seems dry-it should be a soft dough. Put the dough in a lightly oiled bread pan. Sprinkle with the sesame seeds or oats, if using.
Bake for 45 minutes to an hour- it will sound hollow when it is fully cooked.( Evelyn's tip: use an instant read thermometer to determine doneness and the temp. should be around 200 degrees F.)Remove from the pan and wrap the bread in a clean dish towel to keep the crust soft. I did not do this step because I like the slight crunchiness of the exterior.


Sunday, September 13, 2015

Pickle Time

We had a good summer here in my corner of New England. There were enough hot days to be lazy and defect to the beach, enough rainy days to keep the garden alive and many sunny days to walk the dog, use the grill to cook meals and get the house repaired from last winter's  storms.

Currently,  I am watching the Summer's bounty of fresh fruit and vegetables shift to Fall at the farmers market.  So, it is time to get those Summer vegetables in a jar and saved for future meals that will remind us that it was warm here for a while . It is pickling time at my house. I am new to making pickles. I have a crazy fear of botulism that has steered me from canning things and causes me to scrutinize every jar and can I buy at the store. But I pulled up my big girl panties this year and gave it a whirl.

I made two kinds of pickles this year. My garlic pickles are refrigerator pickles and I can toss them together with a little effort. They are the preferred pickle of the men in my family. I also made Bread and Butter pickles. They are like pickle candy. They are sweet and crunchy. There are onions in there to break up the cucumber overload. Now, I cannot imagine tuna salad without those pickles mixed in with a little mayonnaise.  I preserved these pickles in jars because I want to share them with those I cherish. My mother gave me this recipe with the understanding that I will not share it. So, I will only list the Garlic Pickle recipe here. I will say that there are a lot of Bread and Butter recipes out there that look a lot like my mothers so I think that it is not  unique(sorry mom). I will give a hint about the brine. Use equal amounts of apple cider vinegar and granulated sugar...and add some mustard seed. From there, experiment with flavors that appeal to you. Although I love my mothers recipe just as it is, I am tempted to throw a little hot pepper in the brine just to heat it up a bit.
Bread and Butter Pickles await the hamburger!


The garlic pickles are not sweet. They are garlicky, of course, and a bit sour. They are the best side dish to a Reuben sandwich and pulled pork. Because I am busy scarfing down the Bread and Butter pickles, the garlic pickles are mainly a weekend treat eaten by my hard working hubbie and guests. I think it would be easy to preserve these as well but I just give my cherished ones the recipe and encourage them to make their own. They are not hard to make and they do look very cute in a big jar.


Garlic Pickles


5 pounds pickling cucumbers
1/2 gallon  water
1 cup kosher salt
5 cups water
1/3 cup kosher salt
2 tablespoons pickling spice
2 sprigs dill, or 1/2 teaspoon dried dill
4 cloves garlic
2 cups apple cider vinegar
2 tablespoons sugar

1. Put the cucumbers onto a clean glass container. Add the next two ingredients to make a brine. Cover and let sit 7 hours or overnight.

2. Mix the remaining ingredients in a saucepan and bring to a boil. Simmer for a couple of minutes to make the pickling mixture. Turn off the heat and let the brine sit for a moment.  Drain the  cucumbers and rinse with cool water, Drain well. 

3. Pack the cucumbers into a clean glass jar. I rinse the jar with hot water  before adding the cucumbers so the jar won't break when I add the hot brine. Pour the hot pickling mixture over the cucumbers. 

4. Allow the pickles to stand uncovered until room temperature. Cover and chill until ready to eat. 

5. These pickles can be eaten as soon as they are cool but they are better after two weeks.

Note: you can process(can) these pickles. See my thoughts below about the canning process. Also, this recipes halves easily in case you do not have a lot of pickling cucumbers..


Now it is time to talk about canning those pickles. I was not sure I was going to like canning so I did not buy any fancy equipment for the process. I used Weck canning jars that I bought years ago when they were not trendy so they were inexpensive. I did buy new bands for them.  I used a towel in the bottom of my stock pot to buffer the heat from the bottom of the pan so the jars would not crack. I got that tidbit from the Internet and while not ideal, it does work. Last week, I gave in and bought a canning pot with a removable rack that has handles. I love it.
For canning, I found that there is a method for each type of container that you use and each product you want to process. Researching as much as it took to relieve my fears helped enormously so I really recommend that you read as much as you need should you want to can your food. I started with pickles and now I am moving on to barbecue sauce. I have a good recipe that is not forbidden  by "mama law" to share. I will keep you posted but meantime,  try your hand at some yummy pickles.
Yes, I know it is a little sad how this canning pot looks amazing to me. Thanks for understanding.:)


Monday, July 27, 2015

THE DARING BAKERS’ JULY, 2015 CHALLENGE: YAFAWI SFEEHA


The July Daring Bakers’ Challenge was brought to us by Manal from Manal’s Bites. She introduced us to an authentic Palestinian dish from Java that is served as a main meal along with a bowl of soup or a salad. The “Yafawi Sfeeha” or also known as “Milwayeh” which means twisted, is crispy yet tender and full of flavor.Click here for the link to the background information and original recipes from the challenge.

I was nervous about this challenge and especially nervous about getting the shape done. The dough seemed very thin and I saw disaster in my kitchen looming. So, I did a bit of research to see if perhaps there was another acceptable shape that I could manage. I was surprised and happy to see that one of our own in Daring Bakers, The Food Doctor, had blogged about meat pies and had a nice(easy) shape to mimic. So, I am admitting that this may not be a true Yawafi Sfeeha but it is a Sfeeha and it is a fun way to spend a lazy Sunday afternoon.

The Sfeeha look impressive and made the house smell divine. My hubby kept lurking about waiting for me to turn my back so he could  taste test. He loved them but he likes a sauce with most everything and I knew he would want one with these. They don't need them but he was dipping away and said they were really good. I used a Peanut Coconut Sauce from Whole Foods. I put a link on the name to Amazon in case you do not have a Whole Foods nearby but want to try it. Here is a picture of the sauce.
Now back to the Sfeeha. I want to give a suggestion about the baking. Because the Sfeeha bake at a very high temperature, I used two baking pans nested to help insulate. This proved to be a vital step. When I removed the Sfeeha from the oven, two of them were not yet golden brown on the bottom(they were the first two I shaped also) so I removed the others and put the two back in the oven for a few more minutes. When I put them in though, I did not double pan them as I did initially. Within a minute, my oven was smoking. I took them out and they were burned, the parchment paper was burned and here is what they looked like. The underside was black.
No Good :(
But let's talk about the other successful eight! The pastry was crispy outside and cloud like tender inside. The meat was juicy and flavorful, the spices worked well together not overpowering each other or the dish. I served them with braised broccoli rabe and Russian kale but I think a fresh cold salad would have been a better choice. 
All in all, I think these will make a nice pot luck and I plan to bring some to the next book club meeting. They will travel well and don't really need a knife and fork.
Manal has some great versions that are sweet as well. Perhaps you are braver than I am and will give them a try.
Below is the recipe for Sfeeha that I made:

SFEEHA

Ingredients
Dough
2  to 2 1/2 cups flour
1 teaspoon yeast
1/2 teaspoon salt
1/2 teaspoon sugar
3 tablespoons olive oil
3/4 cup water
Filling
1 pound ground beef
1 medium onion, chopped fine
2 tablespoons olive oil
1/2 teaspoon allspice
1/4 teaspoon cardamom
1/4 teaspoon ground cinnamon
1 tablespoon tahini
1 tablespoon sour cream, or Labana
1 tablespoon pomegranate molasses
salt, to taste
1 1/2 teaspoons dried mint flakes

Procedure


    Dough:

    
Proof the yeast by mixing the yeast, sugar and warm water and allowing it to sit for about 5 to 10 minutes until the mixture starts to bubble and foam. 


In a bowl, whisk together the flour and salt. Add the oil and rub the mixture with your fingers to make a coarse looking meal.


Add the water/yeast mixture and knead the dough until it forms a smooth soft dough that does not stick to your hands.


 Lightly coat a clean bowl large enough to allow the dough to expand and put the dough in it. Cover with a towel and allow the dough to double in size. At my house, in 72 degree Fahrenheit, it took a little over an hour. The warmer the room the faster the dough will rise. 


Punch down the dough and cut into 10 balls. Cover them with a towel and allow to rest for about 10 minutes.


Filling:


In a large saute pan over medium heat, saute the onions in the 2 
tablespoons olive oil until translucent, about 5 minutes.


Add the ground beef and spices and continue to cook, stirring constantly, until the beef is browned. Turn off the heat.


Add the molasses, tahini, sour cream or labaneh and mint. Mix well.


Grease your baking sheets or line with parchment paper. Place the oven rack in the center of the oven. Heat the oven to 500 degrees Fahrenheit. The recommended temperature was 270 degrees Celsius(518 degrees F.) but I was uncomfortable cooking higher than 500.  I also double panned my baking sheets for extra insulation.


Roll the dough into a small(I did a 4-inch) circle. Place the filling in the center. Wet your fingers and pinch two sides of the dough circle with your index finger and thumb. Repeat on the other side so that you have four corners
Transfer to the prepared baking sheet and allow to rest 10 minutes.
I you are making a large amount of meat pies, cover the pies with a cloth while they are resting to prevent the surface from drying which will result in cracked surfaces at baking.
Just before baking, re-pinch the corners to , making sure they are sealed tightly. Brush the pastry surface with an egg wash optionally. I mixed an egg with 1/4 cup milk and brushed the pastry using a pastry brush.


Bake the pies for about 10 minutes or until the underside is golden. If they are golden on the bottom but not on top, you can put them under the broiler to brown the tops. i did not have to do this and the egg wash helped promote browning. Transfer to a wire rack and cool slightly. These are delicious warm.